_edited.png)


Hey blog-reading friends!
I'm so excited to talk to you all about our latest whole-house remodel. Our clients were a dream, and their story is even sweeter. They came to us wanting to repair some things within their home after renters had moved out and left the place a little worse for wear. This was the home in which our client raised her children, and so when I heard that her grandson would be moving in I was really excited to be involved in the project.
The home hadn't been changed very much. The tile was redone a few years before, and so the client elected to keep it. They also kept as many doors as they could.
Changes to be made:
1. Kitchen Remodel: demo old kitchen, demo old pantry, re-design kitchen layout, move/add new electrical, new plumbing, remove and replace tiles to make up for new layout, new cabinets, new lighting, new counters, new sink and faucet, add backsplash.
2. House Paint: the entire house (walls, ceiling, and trim) needed painting
3. Drywall repair: old paneling was removed and replaced with new drywall.
4. New Carpet: demo old carpet, replace with new Berber.
5. Replace broken windows, and add new slider in family room.
6. Install and stain new doors to replace broken doors.
7. New chandelier in dining room, new fans in living room and all bedrooms.
8. Install blinds throughout home
9. Bathroom Remodels: demo both master bath, guest bath, and powder room, replace show surround, tile floor, new vanity and fixtures, new accessories.
10. New hinges and knobs on all doors.
11. Add matching baseboards where paneling was replaced.
Design Ideas:
Because this home was going to continue to be a rental, the name of the game was budget-conscious-renter-friendly design. We wanted to make their home look great, salvage as much of the original as possible, and use durable materials that would withstand more wear than normal.
Here are the design boards our clients chose from:
Ultimately, they selected the latter because it was more masculine and I think the end result was neutral enough to accommodate anyone.
Kitchen:
Before


During


After
White shaker cabinets
Dallas White Granite
Oil-bronze hardware, sink, and faucet
White subway tile with white grout
Oyster Bay, by Sherwin Williams wall paint
Rustic dome pendants from Lowe's

Dining Room:
Before


During

After
Repose Grey, by Sherwin Williams paint above chair rail
Alabaster, by Sherwin Williams paint for ceiling, trim, and below chair rail

Powder Room:
Oyster bay, by Sherwin Williams paint
Distressed wooden mirror, Hobby Lobby
Oil-Bronze hardware and accessories


Living Room:
Before

During


After

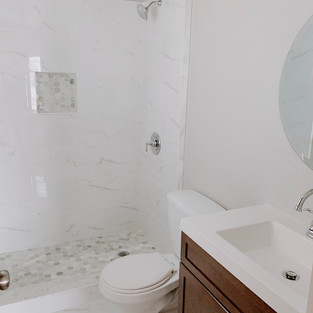
Master Bed and Bath:
Before


During


After
Honed green marble mosaic
Polished porcelain marble-look tile
Chrome fixtures
Repose Grey, by Sherwin Williams wall paint in bathroom and bedroom
Oyster Bay, by Sherwin Williams ceiling paint in bathroom
Alabaster, by Sherwin Williams ceiling paint in bedroom


Guest Rooms and Guest Bath:
Before


After
Honed Marble Mosaic
Polished Porcelain Marble-look tile
Chrome fixtures
Berber carpet


This fixer-upper was given a complete, renter-friendly, face lift and is ready for lots more memory making. If you have any questions about finishes, be sure to leave a comment and ask.
Stay tuned for more blogs on your favorite topics! If there is something specific you'd like to see, make sure you let us know. We want to deliver the best content we can.
xoxo
Alyssa
Comments