.png)

Hey friends! Long time no talk.
It has been such a long time since I've written a post that the Carpal Tunnel fears are real. I did some finger stretches, so wish me luck.
I unplugged from posting for a bit, not for the "I need to be one with my feelings" reason that would probably be good for my mental health, but because WE HAVE BECOME SO UNBELIEVABLY BUSY that there aren't enough hours in the day. So first, I want to thank everyone for all of your support. It's still insane to me that I get to do this dream job and it's only possible because of you. You checking in each week on our site, you clicking on our Facebook and Instagram, you calling us first for your renovation projects/ decorating needs. Be sure to tell us what you want to see so that we are delivering content on our site and social platforms that is fun and fresh!
Also, Merry Christmas and Happy New Year-- because I missed those, too.
Here's a run-down on what's been happening with us!
We're knee deep in bathroom and kitchen renovations. One is a full house remodel and I can;t wait to talk to you about it when it's finished (which, fingers crossed, will be early next week).
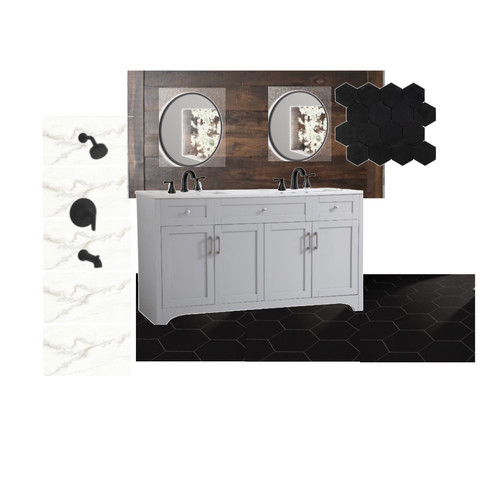
We just recently finished a flip house collaboration and our end was the labor. Our next flip is starting this week! I'll be designing this one, so I'm super excited to show you all what I'm cooking up. Here are some design boards I'm playing around with. The house is in Tampa, so I love the idea of a moody, industrial-style renovation!


Chris and I have been working a lot in the field. He's stepped away from other responsibilities and we are in full-swing Sand & Pine Co. mode. It's been so much fun to work with my buddy, and get my hands dirty on site. I forgot how much I love it! I've been a painting fool, too. There are some jobs no one wants to do and those are my FAVORITE! Like cabinets, doors, vanities, etc. Bring them on. Plus, in a house full of kids there is little time for dirty rap music. Headphones on site = Mama reclaiming her youth in a weird way.
What I do not love, is going to the dump. If I have to explain to you why, then you've never been there. Video Turtorial below:
Death By 1K Birds or Death By Other People's Garbage. Two of my nightmares in one place. Please, no.
On the real, because this blog is SUPPOSED to help you live life with a little less stress, I wanted to address some questions I've been getting! A lot of you want to save some money by painting your front door. I've painted and stained a lot of doors and have it down to a science. So, in the interest of saving you from making a lot of mistakes, here is the easiest way to get it done!
How To: Paint Your Front Door in 5 Easy Steps
1. Prep the door: Remove the hardware (including kick plate), lay down your canvas drop cloth, and tape anything REALLY tricky. I like to tape the door sweep (rubber at the bottom of the door) just because if you have any accidental drips, the paint is really hard to wipe clean from rubber.
*tip: I leave the door on the hinges, open it, and paint over a drop cloth. I rarely have any issues that way. The only reason I remove the knob is because you really need to be able to sand well, and right up and under the hardware.
2. Sand: Sand the door really well, anywhere you plan to apply paint. You don't need to strip the door of its original finish, but you do need to rough it up so it will accept primer and paint. This usually helps to clean the door of any dirt and grime. I usually clean after I sand a front door to save some time. You can even use a broom and dustpan to get rid of any excess sanding dust from your door (and work space).
3. Apply Primer: I use an indoor/outdoor primer and have it tinted (you can do this at your local paint store/ big box store) in the color I plan to paint with. This really helps with coverage and saves you a ton of time. Use your judgement with coats. If you take your time and apply an even and thorough first coat of primer, you likely won't need a second.
4. Paint: Next I paint the entire door in the same method I used to prime it. Use an exterior, or indoor/ outdoor paint. Satin, or Semi Gloss are my go-to sheens for anything that requires durability. I know the flat look is in, but your front door will take a beating! The glossier the paint, the more durable. The first coats are always the worst. I trim out all of the stuff I can't roll, and then I roll the paint on with a 4" cabinet roller like this:

These are my favs because they are cleanable and don't shed. You will absolutely need two coats of paint for the perfect front door.
*tip: when applying paint remember that even, thin coats adhere the best and look the smoothest. Don't over roll! The more you roll over the paint you've just applied, the more likely you are to remove it. I use a much larger pan than I need, apply a heavy dose of paint to the roller, and then even it out on the roller before I apply it to my door.
5. Clean and Reattach: While my paint is drying I like to clean my brushes, rollers, pans, and my work space. On a cool, dry day this usually allows enough time for your door to dry so you can reattach the hardware. Once it's dry to the touch, I reattach everything and then take after pics (duh)!


So there you have it! 5 easy steps to paint your front door! Be sure to share your front door paint projects with us!
Comments