Hey ya'll!
I know I've spoken a lot about prepping furniture for paint, but this last piece I did had legitimate holes punched in it, missing veneer, and broken trim. It was an ideal candidate for a tutorial! Take a look:

At this stage I had removed hardware, pulled out the drawers and begun sanding. This piece produced a tremendous amount of dust. Whatever red gel stain the previous owner used it created a lot of problems throughout this makeover. Even after sanding and a thorough cleaning the red would continue to bleed through primer and paint. More on that in a minute.
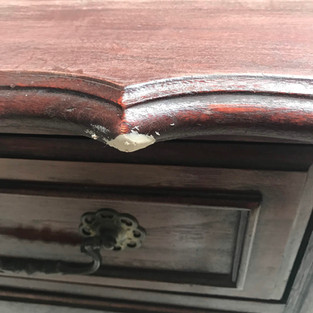
Now that it was sanded down and cleaned I was able to begin repairs. There was a ton of damage:
The left drawer was broken into four pieces
There was chipped veneer on the top
The right side had a quarter sized hole (looks like it was carved out, incorrectly, to accommodate a wire)
There was broken trim on the base
The top trim had a hole in it
There were multiple deep gouges throughout the piece
I chose to use Kwikwood Epoxy Wood Filler to patch and repair any damage, and Gorilla Glue Super Glue for broken doors and the pieces of veneer that were separated but not off completely.
The difficult patches were the large holes. I basically put a big glob of the wood putty into the hole, anchored it to the backing, and then spread it with my fingers until it was as smooth as possible.

This is the same method I use for simpler patches and it worked well. Notice in the picture that the putty sticks out just a bit. When that was finished I used my Mouse Sander to sand it completely flat. On detailed work I use my hand and sand gently and slowly until I get the shape I want. A lot of the experts say to smooth out the putty with a razor, but I find my fingers and a sander work the best. If there is any variation between the patch and the flat surface you will notice it once it's painted. Every time I've tried a razor I've accidentally pushed the putty too far in and have gotten a bad result.
Here is what the patches look like once the putty hardens (usually 8-12 hours).
In the last two pics you can see how red and dusty the finish got after I sanded the putty smooth. Yuck. I cleaned up the piece really well but didn't bother to sand off all of the finish because I intended to use chalk paint. Good thing, too; every spot I sanded became a red disaster.
Next I started painting. My plan was a three-toned, ombre, color fade. I wanted something really unusual for this buffet but the chalk paint, which usually covers anything, was not covering the red death buffet.

I decided to sand this mother down a bit again, prime the entire piece (took two coats and you could still see this crap), and then paint in a darker color. I chose #Valspar's Dancing Slippers which is a shade of teal. FINALLY. No red.

I brushed over the pieces extended parts with white #chalkpaint (Valspar's Kid Gloves), and then again with antiquing wax in the recesses. I used the same brush for both, with no cleaning in between, worked quickly, and then brushed over it again and again until both the colors were smeared together.
I repeated this step until I felt like there was enough variation because I had zero intention of distressing with sandpaper after the red stain debacle.
Here is the final result:
You'll notice in a few of the pictures that there are no pulls on the end doors. Originally there were four pulls with back plates but one of them was broken. So, I decided to use the back plates on the two center doors and omit the plates on the outer doors. Because of that extra girth the screws became too long. I had to buy new screws and attach them after the fact. So glad we decided to keep the original hardware. It made the old buffet look gaudy, but with the new paint color it really pops!
Hope you enjoyed this tutorial today! The hole filling technique can be used in a number of applications, and my mixed-paint distress method would be great for a coastal furniture makeover, or a shabby chic where you don't want to do any end-game sanding. I love how I was able to cover up all of the problem areas in this furniture piece with paint and putty! One man's trash and whatnot...
Here are the other pieces of furniture I refinished to go along with this buffet: A mirror that will live in my client's living room, and a dining room table with the most beautiful wood. I didn't even have to stain it after it was stripped! The polyurethane really brought out its natural beauty so I painted the base in a complimentary color. Teal, grey, and warm-toned wood... Oh MY!
What do you think? Let us know in the comments section below!
xoxo
.png)


